When we graph that, we get this:
Hi! 4 here. I make a lot of cold brew, and it's generally pretty well-recieved, so I'm typing up a guide so I can share my knowledge with others. Most of the tutorials you'll find online on how to make it at home are, frankly, shitty, and it's hard to find good info if you don't know what you need to look for.
This guide should answer every question you have about making cold brew, and a few you don't. If you have more questions, please don't hesitate to shoot me a text or an email, though I can't guarantee I'll have an answer.
Cold brew coffee is a coffee that's brewed with water that's not hot. Most coffee is brewed by grinding up beans and then using hot water to get the caffeine and dissolvable solids out of those ground up beans. You can also brew with cold water (or room temp water), it just takes longer.
Cold brewed coffee tastes different from hot brewed coffee. For a given bean, cold brew will be more rounded and less acidic than hot brewed coffee.
You can brew cold brew at different concentrations. If you weigh out your water and coffee at a normal ratio like 16:1, you can brew a cold brew that's ready to drink as-is. In commercial settings, it's very common to brew a cold brew concentrate, a brew of a higher ratio like 5:1, and then dilute that before serving it. This takes up less fridge space, and also allows the cold brew to be used effectively in more drinks.
The specifics of cold brew will depend on what materials you have, what sort of a brew you're trying to make, and how much cold brew you want to make, but every method will (should?) have the following steps:
You'll notice that most of the steps there have to do with filtering. That's super real. Filtering cold brew, especially large batches, is a pain in the ass. A necessary and worthwhile ass pain though. More on that later.
Like I said, it's gonna look different for everyone. I'm gonna make this list intentionally vague, and then give some examples for each bullet point, and then share my personal setup that I use for batches of 12oz bags of coffee.
You can divide cold brew into two main categories: Straight-up and concentrate. Like I mentioned before, concentrated cold brew is typically the norm for a coffee shop, and straight up cold brew is more commonly made at home. The style that you should go for is up to you. If you're in a hurry (if you're in an actual hurry, choose a different brew method), a ready-to-drink cold brew brews in a shorter period of time than a concentrate. Its concentration means it's best as-is, as it's too weak to mix with anything else.
A cold brew concentrate is more versatile, as its strength allows it to be added to another liquid and not be overpowered by it. If you're planning on using cold brew as an ingredient, definitely make a concentrate.
If you decide a concentrate is the route you want to go, I would strongly suggest making the cold brew with a medium or dark roast. Roasty, toasty, nutty, chocolatey notes work with a much wider variety of other flavors than the fruity notes that you might get from a single origin roast. If your shop has espresso, try making a batch of cold brew with the beans you use for that.
Whether you're making cold brew commercially or for personal use, it's good to know how much to expect to get. I've done some math and managed to cobble together a few simple equations that will give you a rough idea of your yield, and how much undiluted coffee/lattes that'll make.
Grounds tend to absorb about twice their weight in water. This holds true for immersion brews no matter the concentration. Your approximate yield can therefore be calculated with the following equation using the brew ratio and the coffee weight.
yield ≈ coffee (ratio - 2)
So if you brewed a 340 gram bag of beans with a 6:1 ratio, you could expect to get
340 grams (6 - 2) = 340 * 4 = 1.36 liters of CB concentrate
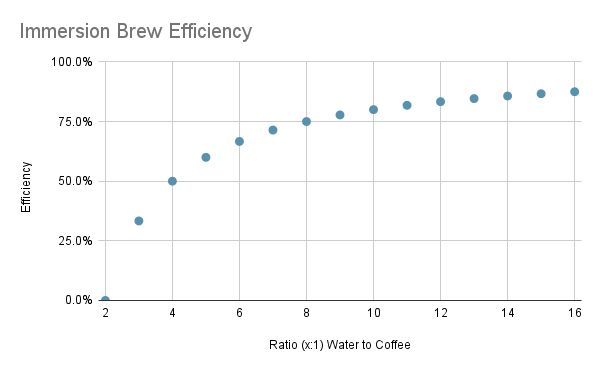
The fact that this holds true for different concentrations means that high concentration batches are less efficient. The efficiency of an immersion brew can be calculated with (r-2)/r, where r is the ratio of water to coffee r:1.
When we graph that, we get this:
You can see that no immersion brew will be 100% efficient. A 60g/L ratio (16.66:1) has an efficiency of 88%, and my cold brew ratio of 5.5:1 has an efficiency of about 64%. The balance you need to find, then, is between efficiency (which, practically, is cost), and space savings, also factoring in what sort of a concentration would work for your drinks.
Calculating the amount of coffee you'd get by diluting the concentrate is very straightforward. Simply multiply your yield by the quotient of your desired diluted ratio divided by your brew ratio. So if were brewing a 6:1 batch of concentrate using 340g of beans, the volume of coffee diluted to a standard 16:1 ratio would be approximately
coffee (brew ratio - 2) * (desired dilution / brew ratio)
340 grams * (6 - 2) * (16 / 6) = 3626.66 ml
Cold brewed coffee is affected by the same parameters that affect any immersion brew, but I'll go over them here in this context. These are all very intertwined, all affecting extraction in some way, and they'll need to be adjusted according to each other. As a result there's a bit of an overlap in the following paragraphs.
But first, I'd like to take a minute to talk about extraction in the context of an immersion brew.
When you're making coffee by percolating, whether that be espresso or a pour over, you have to make sure all of your brewing parameters are carefully balanced, or else you'll run the risk of over or underextracting the coffee. With an immersion brew, you don't have to worry about overextraction as much because you're not introducing any new water.
"New", "empty" water will pull dissolvable solids out of the grounds very readily, but the more solids that are dissolved in the water, the harder it is for the water to dissolve more. This relationship between TDS (total dissolved solids) and brew time can be charted as logarithmic growth. After a while, the TDS pretty much levels off, and giving the brew more time won't lead to much of a difference. With a percolation brew like espresso or a pour over, you're adding in "empty" water all the time, and that water will keep extracting solids from the grounds, making over-extraction easy. With an immersion brew, especially when brewing a concentrate, you won't really have to worry about letting it brew too long.
The parameters that will affect your cold brew are these:
Here's a little table summarizing the effects the parameters have on extraction.
| Parameter | Increases Extraction | Decreases Extraction |
|---|---|---|
| Beans | Darker Roast | Lighter Roast |
| Grind | Finer Grind | Coarser Grind |
| Ratio | Higher Ratio (More Water) |
Lower Ratio (Less Water) |
| Water | ??? | ??? |
| Temperature | Hotter | Colder |
| Time | Longer Brew | Shorter Brew |
Darker roasts will extract faster. This is the case for any brew method. Once you find a combination of parameters that work for a given bean, you may need to adjust them somewhat if you use a significantly darker or lighter bean.
Most coffee grinders that have the different grind sizes labeled will put cold brew all the way on the coarse end of things. This is misleading. If you're making straight-up cold brew with a dark roasted bean, an extra coarse grind can work, and it'll make filtering easier. If you're making a concentrate, however, you'll need to grind much finer. Much finer. At the coffee shop I work at we make a 5.5:1 concentrate, and the grind is comparable to what you'd do for a Beehouse.
The reason for the inaccurate labeling on the grinder is because the grinder manufacturer isn't expecting you to make a concentrate. Most coffee is brewed with about a 16:1 ratio of water to coffee (by weight). The grind sizes you see are expecting that. A finer grind size means more surface area of the coffee is exposed to the water, which boosts extraction. Grind sizes are tailored to brew methods so that the amount of extraction provides a good flavor. Using less water, like you would when making a cold brew concentrate, means that you'll extract more slowly, so you'll need to grind finer to boost extraction again. Sure, you could use a really coarse grind to make your cold brew concentrate and just let it brew for 2+ days, but that seems like a bit much. And speaking of ratios,
The more concentrated you want your cold brew to be, the more you'll have to do to help extraction. This is easiest accomplished by adjusting the grind size or the brew time. A 4:1 ratio will need a finer grind than a 6:1, and a 6:1 a finer grind than a 16:1. If your grinder is a pain to adjust, you'll probably just want to let higher concentrations brew for a few hours more, or start them off with a more aggressive stir. I wouldn't suggest going stronger than 5:1, for efficiency reasons (see section 8).
Okay so I'm not super well-versed in this one, so this won't be comprehensive, but I know the gist.
In order to extract stuff from the ground coffee, the water needs to have minerals in it for the coffee solids to stick to. Distilled water will make absolutely atrocious coffee, and hard water might lead to some undesirable flavors. Smarter people than me have guides out there with recipes for how much of what minerals to add to your coffee in order to get good coffee, and you'll want to look at those if that's a rabbit hole you want to jump down. If it's not, try tap water, try Brita filtered water, and try water from your local third-wave coffee shpo. See what works.
"Cold brew" is a misnomer. You don't have to brew cold. Cold brew is cold relative to the near-boiling water used for hot-brewed coffee. In fact, I'd strongly recommend brewing at room temperature. Not only will this save you some fridge space, but it will speed up your brew!
And in that way, brewing at room temperature, temperature isn't really a parameter worth messing with. Hotter water will lead to faster brews, but one of the main points of cold brew is to enjoy the flavor profile of it and the low acidity that brewing cold allows for. You might see stuff about doing a “hot bloom” and then adding room temperature water, or even ice, but take it from me, this is a blasphemous act.
The only way that temperature has affected my cold brew is that I've been able to brew for less time in a hot room. And speaking of time (I'm so good at this)
You can let cold brew brew for too short of a time, but it's hard to overdo it due to that logarithmic curve I mentioned. As a result, it's better to err on the side of letting a batch brew longer than necessary. This is the only parameter I usually change!
Filtering cold brew can be a headache. Starting out, my filtering process created a huge mound of dishes, took about an hour of work, and used a few big filters. A few innovations have taken that down to a much smaller amount of dishes and about ten minutes of actually doing things. But I'm getting ahead of myself.
Cold brew is filtered to eliminate three things:
Grounds and fines are obvious. You don't want either of those things in a drink. The oils aren't as immediately obvious. Coffee is oily. Paper filters are good at absorbing those oils. Thicker filters, like a Chemex filter, absorb more oils, which lead to a cleaner tasting cup. With a cup of hot coffee, these oils are all liquid, and rest on top of the coffee. With a double shot, the oils trap carbon dioxide bubbles and create crema. You don't want them with cold brew, though. If coffee oils get cold enough though, they congeal, and that looks gross.
How you filter will depend on what you're brewing in. For me, brewing in a bucket, my filtering process looks like this:
I brew in a brewing bag, a mesh bag with holes small enough that the grounds can't get through it, but the water flows freely. When I'm finished, I take the bag out and set it in a large sieve on top of the bucket. I give it a gentle squeeze and then let it drip for at least 15 minutes. This filters out the grounds, and it also takes care of the fines! The waiting gives the fines time to settle to the bottom of the brew vessel. After I carefully pour the contents of the bucket into a big commercial filter, which drips into whatever container I end up using to store the concentrate.If you pour gently and watch the liquid you're pouring, you can see when the fines start to pour. Stop there. This gravity filtering is much less time consuming than using an additional filter.
If you're using a French press to make your cold brew, when you're ready to stop the brew, remove the lid and break the crust of grounds, and then scoop off and dispose of any foam. Carefully put the lid back on, being sure to not press the plunger into the liquid. Let the grounds settle to the bottom for at least 15 minutes, and then gently pour the liquid through the plunger filter and into a paper filter.
The main point is that you're probably going to have to use three filtration methods. Grounds first, fines second, oils third. You can filter two or more of these at once, but the fines will clog everything and make the whole thing painfully slow.
One brilliant idea I had recently was to brew in a large bucket with a spigot near the bottom of it, but not on the bottom of it. Like this one. This would, theoretically, allow the fines to settle to the bottom and give you room to pour liquid out from above the level of the fines for further filtration. I haven't tested this, so I'm not 100% certain that it would work like I think it would. There's a chance the flow of liquid would suck the fines out anyway, but there's also a chance that that wouldn't happen? I have no idea.
Hooray! Your cold brew is all filtered! Wanna give it a taste? Don't!
For reasons beyond my understanding, cold brew tastes better if you let it rest for a few hours in the fridge. I usually let it sit in the fridge overnight before I try it. Something causes the flavor to change (usually for the better) in this time; I've had brews go from bad to great overnight.
You should probably refrigerate the final product. Cold brew (at least the kind I just told you how to make) is technically raw, and as a result it's capable of getting moldy if the circumstances are just wrong, and keeping it in the fridge is a good way to prevent that. That being said, it won't go bad all that quickly out of the fridge; I've carried bottles of concentrate in my backpack for a couple of days and they've tasted fine.
Cold brew is great. Some snobby coffee nerds look down on it because of the flavor profile it tends to bring out of the coffee, but it's a great way to use up old beans that you wouldn't otherwise use, and it's really fantastic if you're a lazy bum like me who stays in bed so long in the morning that making a V60 would also make me late for work. I've had a lot of fun making cold brew over the past couple years, and I hope the info I've gleaned from those batches can help improve your brewing at home.
I'd love to hear about your brews, or if you have any questions or comments or scathing remarks concerning this guide. Shoot me an email!